Get started with your new airlogOne
When you unbox your new airlogOne, you will find the device,
a printed quick start guide, a USB-C cable and the important
Login Card. This card holds the unique login credentials for You and your device, both sharing access to your data in the firebase cloud storage.
Your digital logbook, all your detailed tracks and the complete device configuration is stored here.
This is the detailed and current manual. It represents the current Software version.
airlogOne and airlogOne-mini share the same features and the same manual; only the part "truemotion sensor" is only available for the airlogOne.
Lets go!
SW Version: V1.62 + V2.0
start the device
Make sure the airlogOne is sufficiently charged (minimum 15 minutes powered on the USB port, or charged beforehand).
Press the left button marked "M" briefly. The blue LED will light up, and the unit will begin clearing the screen and starting a self-test procedure.
After initializing the GNSS system (GPS), it waits to receive at least 4 satellites for a complete GPS 3D fix. As a GPS tracker, good GPS reception is fundamentally important. It helps to be near a window or outside with a clear sky view.
If you don't want to wait, press the middle button for about 2 seconds to skip this wait. The device will start and display the normal screen.
It will still attempt to find enough satellites and will show either the "no GPS" or "fix" sign.
config the device
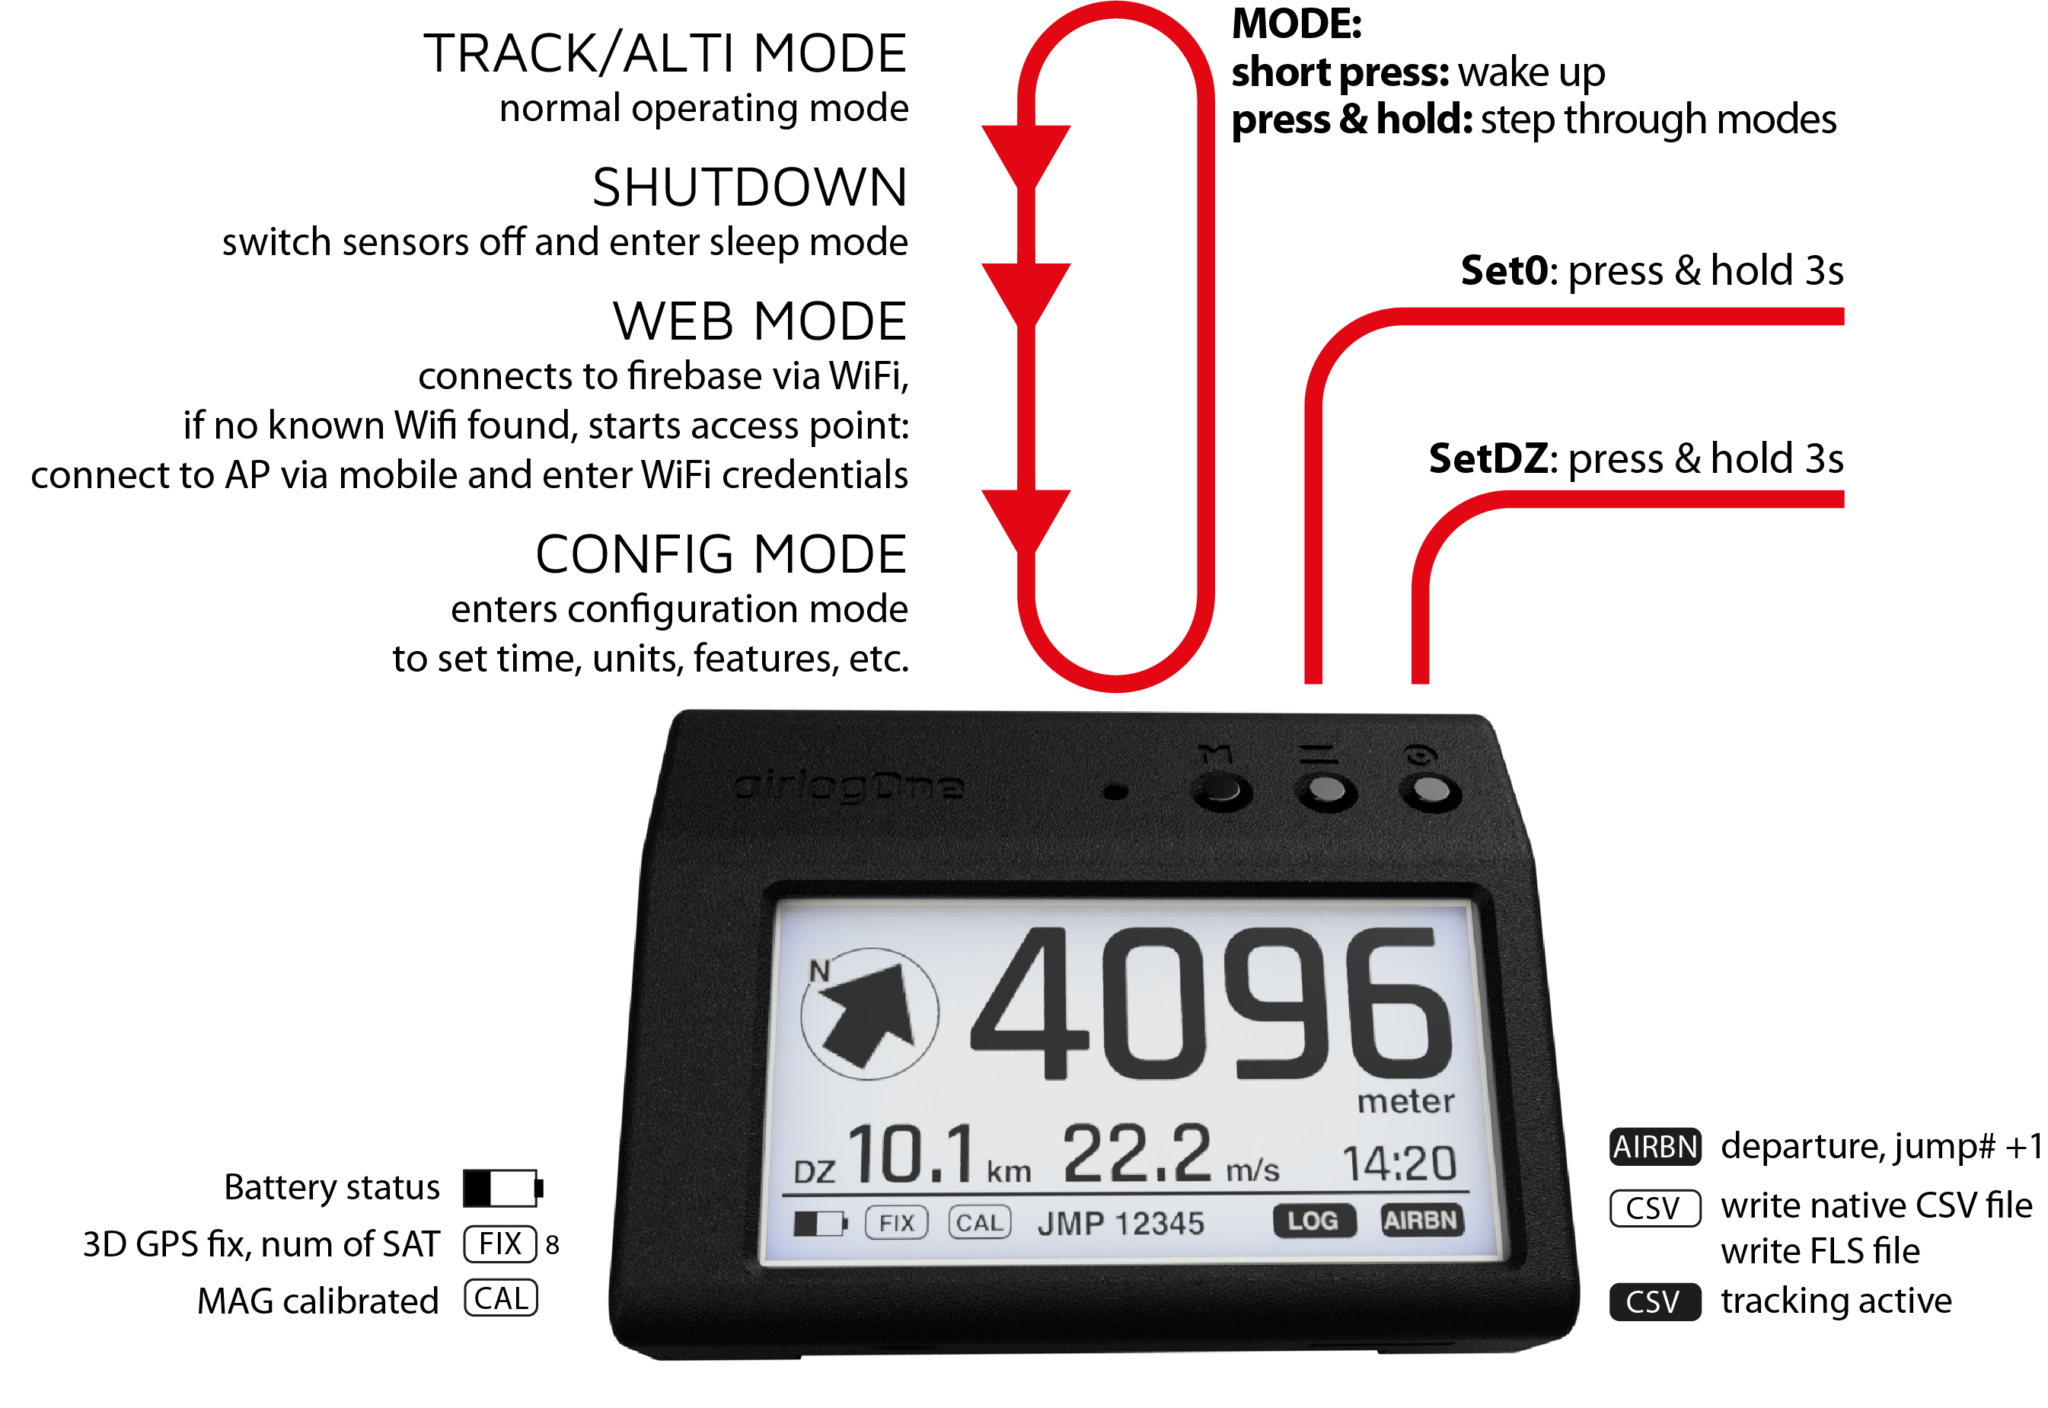
Press and hold the M button until “Configuration” is shown in the display. Release the button.
You can step through the config page with the OK (middle) button. Adjust the values as needed
always remember: complete configuration needs to be done in the online configurator. Online overrides the device configuration>
Info: tracking file formats
the airlogOne can write track files in two different data formats: its own (native) csv format and the Flysight1 compatible format.
The latter is marked in the display with (FLS) and creates a file that can be used in an existing flysight analysis workflow.
The native format is marked in the display with (CSV) and contains more information. This includes all movement data for analysis (only for the airlogOne), and the GPS altitude data and the layered wind data for the track, if this option has been selected (for all devices).
If working with the airlog.app, leave the data mode set to “CSV”.
connect to airlog.app
You can skip this section if you want to collect jump data first.
To completely set-up your device, the connection to the airlog.app config page is necessary, as more information about you and your device is collected here. This info is necessary to automatically write your online logbook.
Remember: Online configuration overrides device configuration
Open the airlog.app website (https://airlog.app) and log-in using the credentials provided on your Hello Card in the box
Devices with firmware version V2.xx and up use the new next.airlog.app database at https://next.airlog.app
chest or wrist?
the airlogOne has two operating modes: wrist or chest. Or in other words: mobile and fixed.
When mounted on the wrist the device has always changing orientations. This is fine for altitude, speed and GPS tracks, but its hard to measure accelerations and turns, since they don’t differ from moving the arm.
When the device is attached to a fixed position (chest, mud flap), the orientation detector (AHRS) inside the device reflects the orientation change of the entire jumper, providing much deeper insight into cause and effect.
Changing the operating mode rotates the entire screen, making it easier to read on the chest strap.
e-paper refresh
You will notice an occasional flashing of the e-paper screen. This is normal and necessary.
The excellent readability of the e-paper screen comes at a price: in very bright sunlight and with a fast update rate, the image contrast is not as stable as in slow mode. As a result, the background turns grey.
To avoid this, a refresh cycle is installed as standard every 10 seconds to clean the screen. It takes about 250ms.
Depending on the wearing position, the weather and your personal taste, this may be necessary much less frequently.
You can set the refresh rate yourself: in the device configuration or in the web interface under “sunlight-refresh”. The number indicates the time between updates in seconds.
sleep mode
after 1 hr of non-use (no button pressed, no AIBRN) the airlogOne switches into "sleep mode". All sensors plus the display are switched off to save energy. For identification, on the screen is shown your "callsign" and your last jump#
To wake up again, press the M button once and the device wakes up, hot-starts GPS and sets zero GND position.
(HOME position is kept during the same day, if set before)
Make it a habit to press any button shortly to reset the sleep counter when you gear up, to keep the device from sleeping within the next hour.
airlogOne:
truemove sensors
With the introduction of the truemove technology in the airlogONE, the next step in motion analysis becomes reality. In addition to pressure and position sensors (GPS), airlogONE contains a complete AHRS = Attitude & Heading Reference System.
This is used to record the exact orientation of the device – or the jumper. You surely have seen an AHRS in action as a Wii controller that follows all your movements on the screen. It can also be used to take precise acceleration and rotation measurements.
This opens up completely new possibilities: Attached to the wrist, the orientation of the device can be captured to assign acceleration readings to the axis of motion.
If the airlogONE is worn in a fixed position on the chest strap/mudflap, further possibilities arise: acceleration and rotation, but also the orientation of the jumper can be recorded. In the later analysis, it is thus possible for the first time to determine the effects of f.i. a changed angle of attack on the flight performance.
In the future, airlogONE and the dashboard software Airlog.app will offer further, very detailed analysis tools.
soft reset and hard reset
If the device seems to be stuck, there is a soft-reset and a hard-reset.
A soft-reset can be used, for example, to get the device out of the WiFi search process.
For a soft-reset, keep the left and right buttons pressed simultaneously for a moment. The device will restart.
For a hard-reset, use a paper clip wire (<2mm / 1/16") and press the button inside the hole on the back of the device. Use the hole near the bend of the housing.